I have always taught solving 2-step linear equations by starting with a balance scale. Having students whittle their way down to see how many marbles were in each bag was always a win for me…..in most cases.
I valued this approach. It’s easy to visualize and it strengthens the “whatever you do to one side of an equation you do to the other” mantra we tell students when solving . However, I’ve always been left wanting more especially when we introduce solving equations with negative coefficients or even when the solution is a negative value. The balance scale kinda loses it’s effectiveness.
Using algebra tiles help fill this hole. And now…. thanks to Andrew Stadel, double clotheslines.
I was lucky enough to attend Andrew’s NCTM Annual session on Error Analysis this year. In his session he demonstrated how to use a double clothesline to solve equations. I later found this resource on his site. Watch his videos on how to use the clotheslines….they helped me piece this lesson together. Stop now and go and watch Andrew’s video on solving two step equations.
I stared as Andrew did at the NCTM session:
I put 0 on the top line and 0x on the bottom line.
I then held up the 3x card and asked where should this go? I asked if it should go on the left or the right of zero. The students overwhelming said it needed to go on the right. “3x is more than x, so it should go more to the right, just like a number line” (Always — Sometimes — Never was going through my head at this moment but i’ll wait to talk about this with the kids until a bit later in the lesson). 
I then said “I’m going to place this 15 right above the 3x and that means equivalence. 3x is the same as 15”
Where should 9x go? You could see the some students spacing out where 9x should go. This is what I love about this method. It’s so visual and we’re forced to always think about how terms relate to each other.
I want to know what number should be above 9x. I had them draw the number lines on their desks and let them work on determining the value of 9x.
Going around the room there were a few different types of solutions. Some students said, “3 times 3x is 9x, so 3 times 15 is 45”
Some students said, “If 3x is 15 one x is 5, so 9x is 45.” Nice. We ensured the whole class understood both of these types.
Next puzzle: I asked where to place 3x + 4…then assigned it the value of 16.
Where should 3x be placed? It was easy to see that 3x is less than 3x + 4 so it should go to the left. Now for the amazing moment! What should be the number above?
from the class an overwhelmingly 12 was shouted. So now what must be the value of x?
Student: “The dividing is the easy part” We spent a few minutes here talking about why dividing 12 by 3 here makes sense.
Next Puzzle:
Where should the 5x go? At first some students had some difficulty deciding if it should go to the left or right of 5x – 2.
Once we settled to the right. They jumped to finishing it off to determine x.
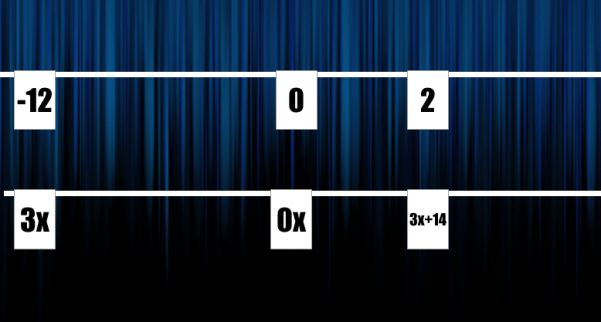
Next Puzzle:
Where 3x should go was a discussion. We all agreed it should be 14 down…..and where would that be? This is where the clothesline (number line) feels superior and the balance scale visual falls short. We can use the bi direction of the number line to continue working with negative values.
What was awesome during this class was this wasn’t a big deal….the number lines seems natural!!
Also watch Andrew’s example with negative coefficients.
I had students practice solving a variety of equations by drawing the cards on their handout.
They finally demonstrated their understanding by creating their own equation where x had to equal 4. They put their creations up around the room for the group to solve.
I feel that the number line (clothesline) method builds a lot of great number sense. We get to reinforce our inverse operations as we build from conceptual understanding to abstract. Students’ strengthen their understanding of algebraic expressions and how those expressions relate to others.
I’m now going to investigate how to to demonstrate solving multi-step equations…. 3x + 5 = 2x + 7 using the clothesline. I’m thinking this might be a difficult task. Any ideas????
[UPDATE] – Solving equations with expression on both sides.
Since this lesson my class used the double number line to solve equations like 4x + 10 = 6x + 2. It was great to keep some continuity here while we solved harder equations.
We placed each side of the equation on separate clotheslines just like before.

We didn’t want to re-invent a new strategy….we were great at solving equations when one line was used for numbers and the other for expressions…..so we wanted that. How can we get one line to be just numbers and one to have the expression? We subtracted 4x from both lines. Which left us exactly where we were last class!!
and then we subtracted 2 from both to isolate the “x-term”
Finally dividing by 2
Boom!
This will be our method too to solve a system of equations that are both in terms of y.
More clothesline:


